Hello there, so you want to be a blogger, right? I want to assure you that you made the right decision since there are a lot of benefits that bloggers receive right from brand recognition to income generation, some bloggers make up to $300,000 per month right through blogging alone crazy right?
The process of creating and running a website can be quite complicated for a beginner hence my company can create and manage for you a website for a small fee of $35 the first month (this price is inclusive of the domain name, one free professional mail box and a professional theme will be installed) and $10 per month to cater for maintenance and hosting services. Contact us via email by using the form below to get yours now! We have serviced more than 20 customers already and you can find the testimonial on our company’s main website at neushub.com courtesy of my company Neushub Digital Media.
Being a blogger requires that you have knowledge about a lot of topics right from basic coding skills to SEO(Search engine marketing) but don’t worry I am going to take you through every step of the way till you reach your desired goal so let’s dive in!
STEP 1: FIND YOUR NICHE
So, what is niche you may ask, Niche simply refers to the topic that you are interested in and you would like to blog about, whither you are into swimming, food, travelling or technology just like me you should take a deep breath and think hard about what topic you love to talk about to you friends and family. Please pay attention to this step since it is very important if you choose the wrong niche your blog has a 95% chance of failing HARD since you can’t keep writing about what you don’t like hence your interest will fall drastically.
Alternatively, there are a number of factors you will need to consider while searching for what gives you inner peace such as: keyword research and availability, monthly search traffic, affiliate marketing potential and many more.
STEP 2: FIND AND BUY A DOMAIN AND HOSTING PROVIDER.
When starting a blog you will need to invest some money on a good domain and a reputable hosting provider alternatively I am going to cover how to start a blog using ZERO investment but I highly discourage you from using this free option since it will hurt your brand and it will take forever to be successful so lets dig in!
When thinking of a domain you will need to consider several factors such: its relation to you blog niche as discussed above, it should be very easy to spell such as my blog(techspot.info), you should avoid misspellings and also adding numbers and characters to you blog address such as domain34.com or great-domain.com according to a study by Seoptimer website with special characters and numbers have great disadvantages such as:
- Negatively affect the brand of the organization or blog in our case since Google will think that your site is a spam
- It also makes it hard for search engine bots such as page crawlers to scan your website and determine what is in your pages this will also adversely affect to search engine visibility of your site
- You may run into legal issue concerning trademarks and patents incase another business has claimed the domain name with no special characters
Thinking of a valid domain name can be quite hard and even to make is worse, most of the good once are already taken sad right? But don’t worry I am going to give you a few tips that I found quite useful for me:
- Use your own name, when starting a blog, you should not think like a typical blogger but think like an entrepreneur who want to scale and build a brand hence the easiest way is to use your own name as the domain name ie yourname.com a lot of bloggers have used this trick to build a very successful blog/brand for themselves.
- Use the random word generator, since most English names have already been taken and those available are sold at a very high price up to $1000 the other alternative is to use non-English word don’t forget that they need to be easy to spell and pronounce. I found an online tool that you can use Randomwordgenerator.
BUYING THE DOMAIN NAME.
Now that you have a list of proposed domain name now its time to buy it, but FIRST you will need to check if its available before you get disappointed, type in the proposed domain name in the box below to check its availability one by one till you find the available on.
Now that you have found the perfect domain name now we purchase it, luckily you can get a FREE domain for the first year plus a hosting plan starting from $2.95/month with Bluehost! Here is how to get started:
- Go to bluehost.com and click get started.
- Then scroll down and select the basic plan.
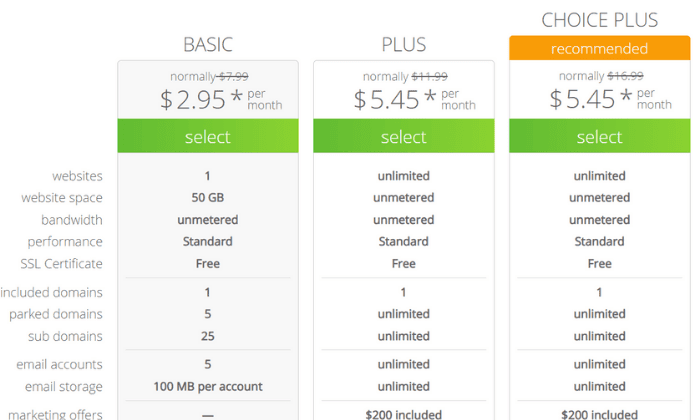
- Then place your available domain name on the following box and click next, remember this is a free domain, bluehost.com pays it for you.
- Next you will be required to fill in your detail.
- Just before you check out remember to uncheck all the other addons in your check out page expect the domain privacy and protection addon.
- And finally check out and pay.
Ready to start with bluehost?
The Bluehost method is a long term solution for those who have the money but if your budget is lower and prefer paying the hosting provider on a monthly basis you may opt in for dreamhost.com where you will be required to pay $4.95 per month and $7.99 for the domain name all you need to do is head to dreamhost.com then click on wordpress basic and then choose the monthly option on the top of the price and click on sign up now.
STEP3 : INSTALL WORDPRESS IN YOUR BLUEHOST PANEL
There are a few blogging platforms such as blogger and wix but one of the most popular and effective blogging platform is WordPress. Over 95% of all websites found online are proudly powered by wordpress, bluehost makes it incredible easy to install a fully functional wordpress blog in just ONE CLICK! Here is how you will do it, after purchasing the bluehost basic plan you will be automatically logged in then you will see dashboard that looks like this
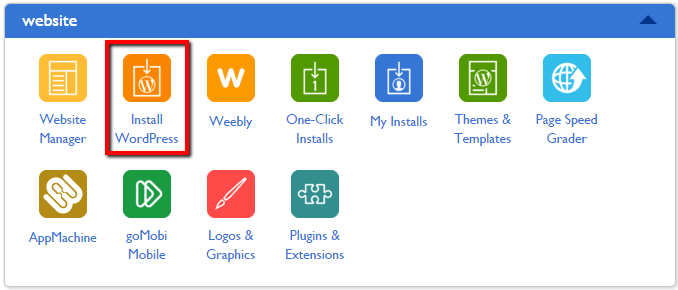
Now click on the install wordpress option then follow the steps is choosing the website where you want it to be installed, wait for it to be completed and walaa! Its done now when you go to the website it will look like this
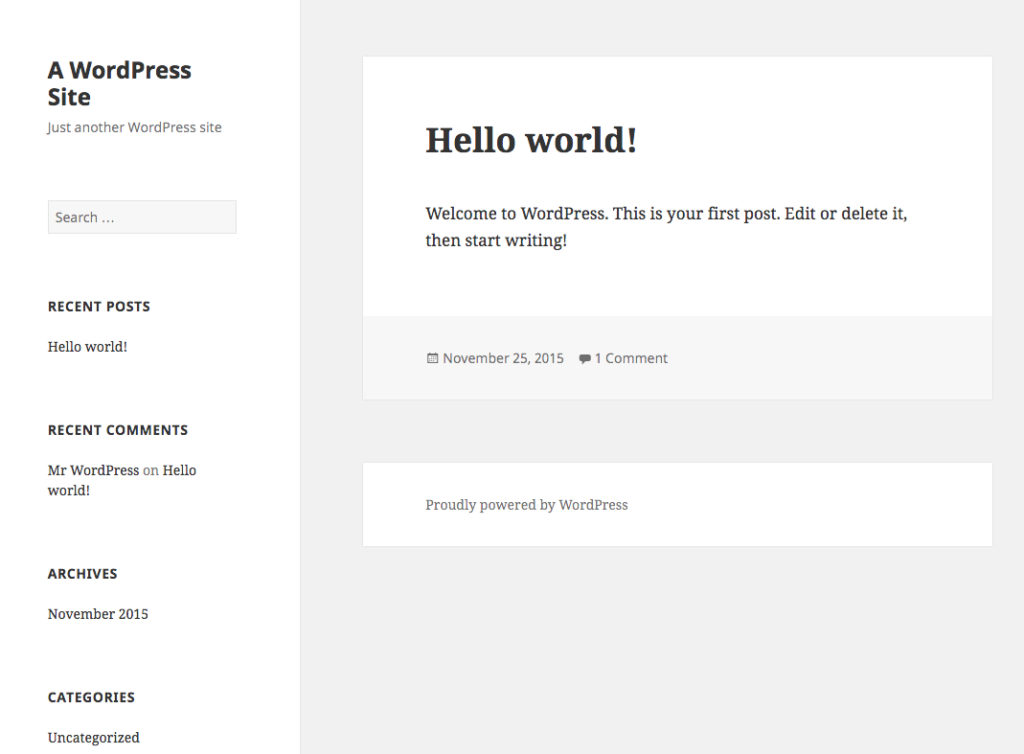
And the log in page, which can be accessed through a link like this ie yourdomain.com/wp-admin will look like this
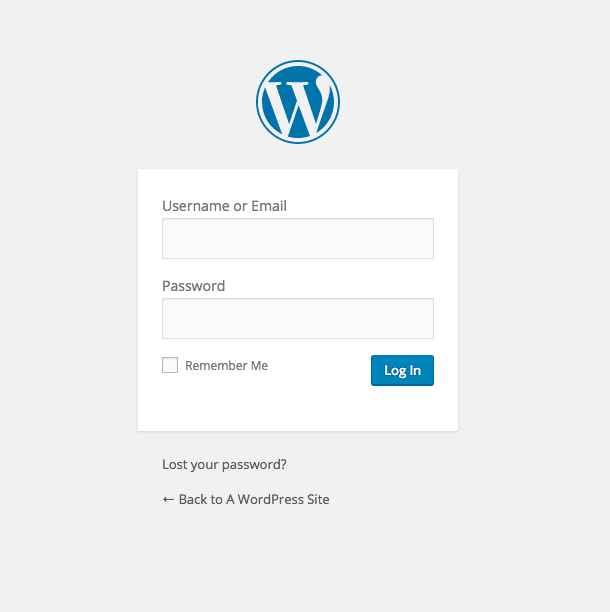
STEP 4: INSTALL A BETTER THEME.
By default, after installing wordpress Theme 2020 or whatever year you will be reading this post will be automatically activated hence getting the boring look above, you will need to install a better theme
HOW WILL I FIND A BETTER THEME YOU MAY ASK
Professional themes are quite costly in the internet some go for as high as $120 don’t belive it? Just search for “professional wordpress themes” and see for yourself, but fear not! I am going to show you how to find better themes for just $16/month just follow these steps:
- Go to envato.com then choose the individual plan and click start now
- Fill in the check out form and complete your purchase.
- Now that you have an account search for “professional WordPress blogging themes” at the top bar.
- Choose the theme that best suites you.
- Download the theme then continue to read this post to learn how to install in in your wordpress blog
HOW TO INSTALL A WORDPRESS THEME
After downloading you theme from envato.com now you need to upload and activate in in your wordpress theme.
Log into you website then at the right side bar just hover with you mouse over ‘appearance’ and a menu will pop up then click on themes.
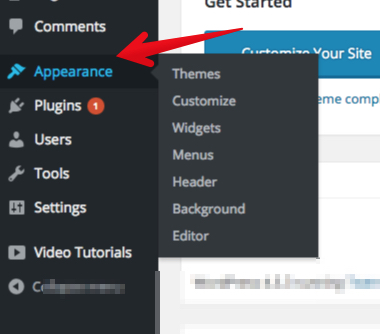
Then click on ‘add new’ button at the top right side of the page
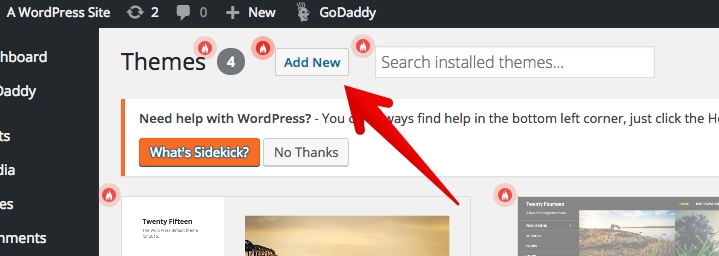
After which you will be directed to another page then click on ‘upload theme’ then click on ‘choose file’ and select your downloaded theme in ‘zip’ format and click install now.
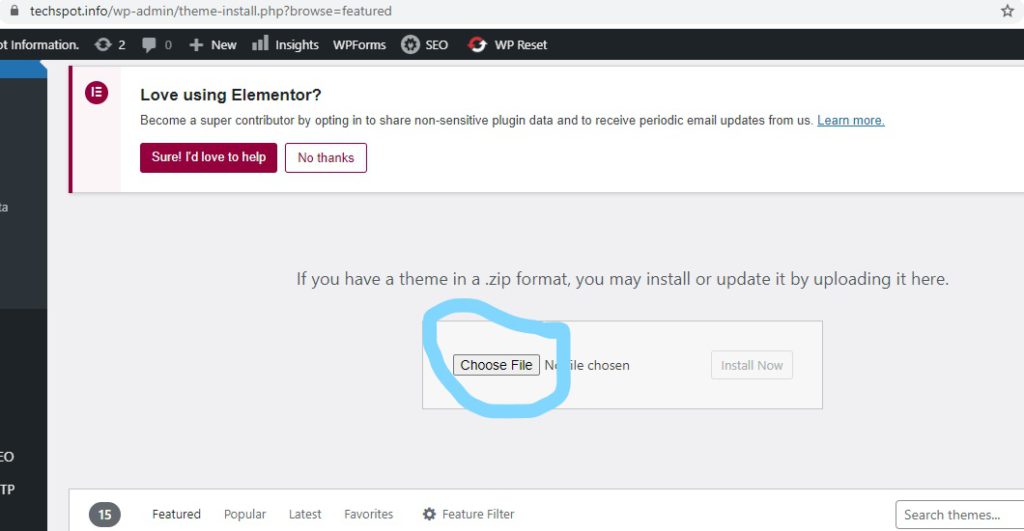
Alternatively, if you want the free theme simply choose one from the list found in the ‘themes’ page.
CUSTOMISE YOUR WEBSITE
After successfully installing a theme next you need to customize your website first you will change the title and the description of the website so that Google may know what your website is all about.
To do this go to the right side bar of your website, locate the settings button then hover over it for the sub menu to pop up, then click on ‘general’ and edit the ‘site title’ and ‘tagline’ then click on ‘save changes’ at the bottom of the page.
WRITE YOUR FIRST ARTICLE AND PUBLISH IT
Well now that we are done with the technical part we now move into the creative part creating your first blog post! To do this look at the main menu again at the left side bar and you will see ‘posts’ click on it the click once again on add new.
While writing your post you might find grammar challenges and error will will most likely hurt your SEO score wil Google so I recommend that you use grammarly, you can either start for free or pay $12 per month for more advanced features such as plagiarism score.


